Teaching Ball-Screens
The ball-screen (or on-ball screen, ‘OBS’) is arguably the most popular two-player action used in basketball around the world. Its goal, like most two-player actions, is to create a momentary 2v1 situation for the offence - creating rotations and open shots. In this blog we’ll scratch the surface on:
Different types of ball screens
Key teaching points for on-ball screens
How to practise on-ball screens in your training session.
Types of Ball Screens
Three common ball screens we talk about in our Cougars training sessions are the “Chase”, Drag” and “Punch” ball screens:
“Chase” ball screen
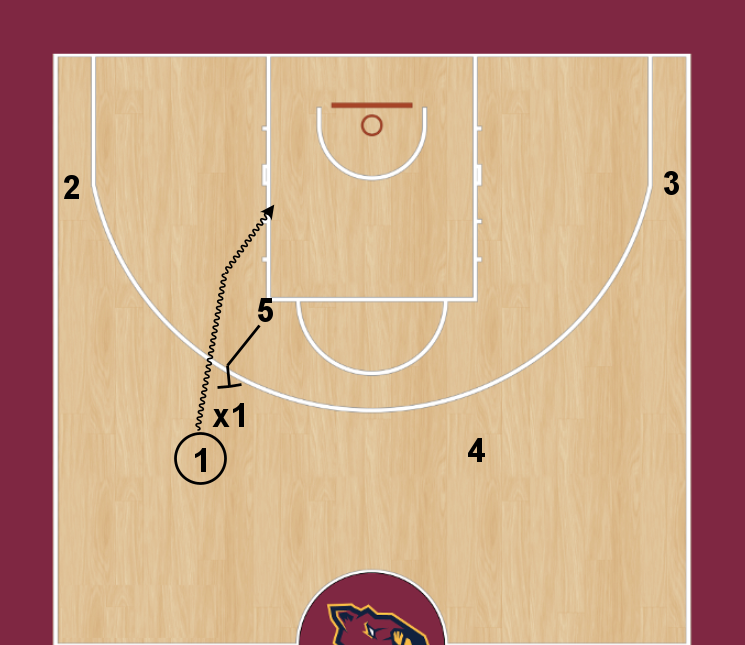
A “Chase” ball-screen occurs when a passer follows their pass and sets a ball-screen for the receiver.
“Drag” ball screen
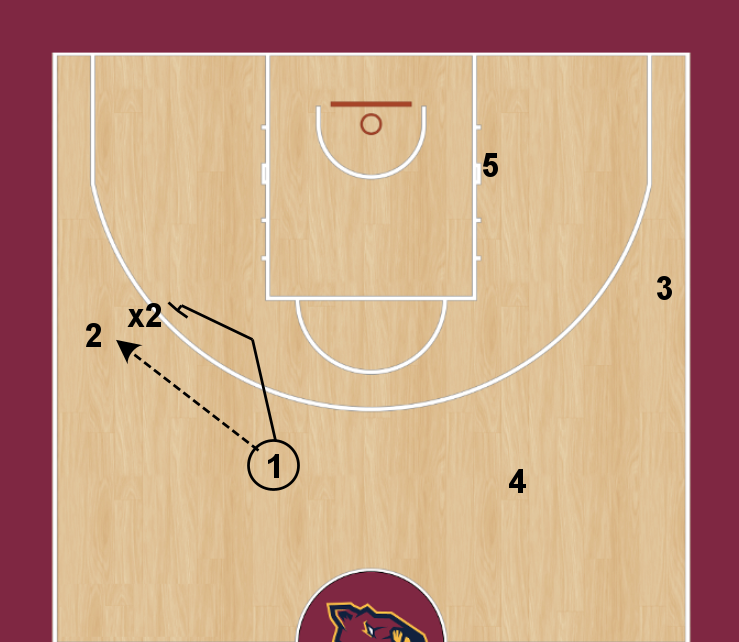
A “Drag” ball-screen is where a trailing player (‘trail’) sets a ball-screen for the ball-handler, usually early in the team’s offence and in the middle of the court.
“Punch” ball screen
A “Punch” or ‘step-up’ ball-screen occurs when the screener’s angle is square to the baseline: these screens are typically set around around the elbow and seam, enabling a direct driving path to the basket.
“Middle on-ball”
A ball-screen set for a player in the middle of the court (e.g. seam) - see “Drag Screen” diagram
“Wing on-ball”
A ball-screen set for a player on the wing - see “Chase Ball Screen” diagram
Teaching Points - Screener
We will use 3 Ss for the novice screener: SPRINT, SET, SEPARATE
SPRINT
The screener shouldn’t dawdle to make their screen, they should sprint the first 80% and then slow as they approach the target defender.
SET
When setting screens, players need to think “take contact, don’t make contact” to avoid offensive fouls. The screener should set their screen with a solid base (feet shoulder-width apart, slightly seated), and point their back to where they want their teammate to be open. Most beginner players point their back towards the sideline rather than the keyway/basket, which gives the offence allows the defender to easily go under and . Once they have set the screen, the onus is on the dribbler to use it well and set their defender into the screen.
SEPARATE
An on-ball screen is not simply to get the dribbler a scoring opportunity - it is equally for the screener. So once the dribbler has come off the screen, it’s important for the screener to sprint away from ‘the scene of the crime’ and get open by either a:
‘Roll’: Cutting/Sliding to the basket to receive a pass and lay-up from the driver.
‘Pop’: Running to space for a mid-range or 3-point jump shot.
As players advance, you may teach ‘slipping’ screens as a skill which can be particularly effective versus switching and trapping defences.
Teaching Points - Dribbler
Set the defender up. Using a jab fake or a dribble away from the screener as they approach can help to distract the dribbler’s defender, and get them off-balance when the screen is set.
Read the defender. It’s important for the dribbler to watch what the defender when using the screen. Do they go under, and if so do I have an open shot? Do they ‘cheat and go around the screen before I’ve used it? If so, dribblers should ‘reject’ the screen and drive in the opposite direction. A good question to ask here is “what did you see your defender do?”
Brush shoulders with the screener. If the dribbler is trying to get to the basket using the screen, they should practice brushing the screener’s shoulder as they drive past to remove any gap the defender has to squeeze through. This increases the chances of achieving a 2v1 situation and defensive rotations.
Training Activities
Three ways to practice ball screens in your training session are:
2v0: You could start teaching the techniques through a fun, competitive shooting game such as “Scoring Duos”.
2v2: Practising ball screens 2v2 will give the offence some confidence to score by removing any help defence available to the defenders. Have players rotate from offence, to defence, to queuing (if needed)
3v3 or 4v4: This will help the defence by adding help defenders, which will then allow the offence to explore how they use players 3 & 4 in ‘receiver spots’ when defensive rotations occur.


